Santa delivers early for the builder (all the way from the amazon)

We have a new rotary hammer drill for use in our ongoing war against ditches that refuse to dig themselves.  Frost in the ground, nasty pit run soil conditions and lots of site work have led to me conclude that heavier tools are needed.  And of course renting would mean driving around fighting holiday traffic far from the Killarney project sites.

This is the last time our drill will be clean, as much demolition and jackhammering needs to be done to get the rowhouse under slab services in.  Plus more window wells are inevitably needing excavation. 

This is the last time our drill will be clean, as much demolition and jackhammering needs to be done to get the rowhouse under slab services in.  Plus more window wells are inevitably needing excavation. 

Rowhouse framing part 1

This is the first of a multi part series of posts detailing how the threeplex will be framed. Day one has the crew arriving to set up and prepare the top of the foundation wall with a gasket and plate. They then put out a heavy doubly ply parallam beam onto the metal post and the pad footing below.  By this time it was getting late so they joisted much of the first floor and have wrapped up for today.  We've had great dry weather, but the lack of daylight means we are dark at 5 pm.  I am sure the framers can't wait for the winter solstice to be over and longer days in 2018.


IMAGE.JPG

Lots of work yet to come. The machine is tied up at the other site awaiting delivery back to Killarney.  Once it arrives we will see some quick progress on getting the frame up.    

Rowhouse - progress finally after 19 months

With the delivery of our first framing package at the rowhouse site, we are officially on the cusp of getting out of the ground and building upwards.  Certain project milestones can actually feel like you've arrived at the finish line, which is funny in a strange way, for a multi family site where you've yet to hammer on the first stick of lumber.

The site was purchased with the first contract signed May 14 2016, so that is a full 19 months up to this point where we can build the structure.  Much of the delay was in land use re-designation, and difficult permitting of the DP and parts of the BP.  Getting the construction documents in place also led to more challenges on site, particularly with respect to the storm water management and foundation designs.  I'm attempting to avoid calculating what the holding cost has been on the property for the last 19 months in terms of taxes, fees, utilities, rental, financing, capital cost, builder sanity, etc.  

The positive news is I've made arrangements with my current favourite framing crew to put the building up. They are just completing a unique job at an architect designed detached property overlooking the saddledome at the top of Ramsay.  Hopefully the full crew can come back to Killarney right away and tackle the threeplex.  We are quickly approaching the Christmas seasonal shutdown so I have ordered a bunch of material including the roof trusses.  Ideally we can use this unseasonably good weather to get the structure up.

Part of the first delivery.  The site has good access and room to store material at the front, back, and maybe even the side.  Still some backfill left to do in the tight south sideyard, but we are ready to start the frame. 

Part of the first delivery.  The site has good access and room to store material at the front, back, and maybe even the side.  Still some backfill left to do in the tight south sideyard, but we are ready to start the frame. 


Rowhouse foundation insulation of walkout and backfill

Definitely a relieved builder to see dirt going back into the excavated area.  Having an open excavation in the middle of a busy neighbourhood is more risk that I don’t need.  With the engineer and city inspector giving the go ahead we are dumping dirt back in the hole.  That gives us opportunity to deliver the lumber and install the floor package.     


IMAGE.JPG

Electrical underway

The semi d project is moving along again with the stucco prep almost done and the electricians wiring up the first house.  Lots of pot lights seems to be the trend on this project.  Ideally we get to inspections here so we can spray foam and cover the many cantilevers and the soffits can be done.  


IMAGE.JPG

Window well install

Given the new and bulky shape of the window well the excavation needs to be extra large to accommodate the install brackets.  This is strange because the old style window well was huge already.  The code changed and now the old precast won't do for fire escape.  

We dug out just enough and they all fit. What a relief.  Less luck with the stairs however because one was too large and will need modification.  


IMAGE.JPG

the precast window well is definitely not the fire escape bottleneck  

Rowhouse preparation for backfill

With damproofing done, electrical conduit run where it needs to be and weeping tile in place the last task before backfill is the gravel.  The gravel cover goes on the weeping tile to bed it in place and ensure any groundwater can flow into the weeping tile.  Site access was poor however the slinger truck was able to make it work.  


IMAGE.JPG

Lots of conduit for electrical lines later that run below the slab. 

Ditch digging continues

Use of large precast window wells necessitates a large hole in the ground to fit the oversized concrete walls.  

Each time I prepare the site for these it seems not enough room is left.  With the deliveries booked for this week, little option remains except to grab the shovel.  Frozen ground conditions don’t help.  


IMAGE.JPG

Giant hole in the ground so the precast window well can fit. It will then need a lot of backfill but I’ll be making sure a machine does that. 

Preparations for Stucco

While we are a long way from enjoying stucco weather, we need to prepare the building to resist the elements and protect the interior as we approach insulating and drywalling, not exactly the materials you want to have exposed to moisture.

Once again I have turned to my friendly lebanese crew to do the stucco, but for preparing the paper and wire component I have a separate crew of equally skilled guys.  They will do the all important flashing, membrane, peel and stick window application, paper and wire, and soffit fascia, siding, and all that goes along with it.

Here we have the black paper applied beneath the tyvek that is under the window flange.  This is step 1 of the process.

Here we have the black paper applied beneath the tyvek that is under the window flange.  This is step 1 of the process.

In step 2, the peel and stick is applied to the window flange on the vertical sides of the window.

In step 2, the peel and stick is applied to the window flange on the vertical sides of the window.

A reverse drip flashing is applied below the window to prevent water being able to get behind the stucco

A reverse drip flashing is applied below the window to prevent water being able to get behind the stucco

A bottom flashing is applied below the level of the framing so no water can reverse into the wood structure.

A bottom flashing is applied below the level of the framing so no water can reverse into the wood structure.

A drip flashing with end dams is extended well over the width of the frame, along with the peel and stick and building paper.  Note the small amount of paper (tyvek), that is left hanging over the drip flashing.  This allows much easier cl…

A drip flashing with end dams is extended well over the width of the frame, along with the peel and stick and building paper.  Note the small amount of paper (tyvek), that is left hanging over the drip flashing.  This allows much easier clean up after the stucco is applied.  It just cuts off leaving a nice clean flashing, much less work for the stucco guys.

After all this paper work the wire of the metal lath is applied, carefully only nailed to the studs. This is what bears the weight of the sand and cement mixture.  This is a good crew of skilled tradespeople with a lot of experience in ensuring the building does not leak.  Claude is the guy who runs the operation, and he has observed every possible candidate area to leak.  I am confident this will be done well, and the stucco will have the best possible life span.

Killarney Sea Can Project!

A killarney builder/mad scientist type is launching a sea can garage house in the yard of typical 50 ft r2 lot on 32nd ST.  This is an interesting and bold choice to tackle this, and I appreciate it.  I have been less than enthusiastic about these garage suites because the cost of building such a small structure is so punitive.  I am pretty sure I have built an entire 1900 sq ft semi detached home with a full basement and a garage for not much more construction expenditure than some garage houses that have been built in the area.  

The value proposition of these things is lacking (depending on what it eventually costs).  Of course I have to buy the land too, usually these are built by owners who may have bought a house years ago for a very low price and just want to add or improve it, so their land cost is nil.  Unfortunately if you do build a garage suite you may be left with a really rough old bungalow in the front yard, and you have to cobble together a workable sewer gas and water system.  I assume because I know how to do this stuff and what it will take to get it done properly I am more hesitant to try it than someone that has little inner city redevelopment experience, but is enamoured with the notion of having a unique carriage house in the back yard.  It is good to see people launch passion projects like this and overcome the business case argument that seems to control my every move these days. 

three of the cans are welded together and windows and doors cut out

three of the cans are welded together and windows and doors cut out

it appears that the cans will be hoisted onto this garage slab that is built using an insulated concrete form frost wall.  I'd like to build something like this but I am way too tied up with the rowhouse project, a mad science experiment in its…

it appears that the cans will be hoisted onto this garage slab that is built using an insulated concrete form frost wall.  I'd like to build something like this but I am way too tied up with the rowhouse project, a mad science experiment in its own way...

Rowhouse basement unveiling

The rowhouse was poured yesterday and the forms are coming off now.  I always appreciate the appearance of the raw concrete beneath the forms as a sort of unveiling of the new work in progress that can really start with that solid base.

We've also been blessed by warm western winds for the last week and the mud has dried, making the form strippers job a whole lot less hazardous.  

Here we have the basement being stripped and the foundation is unveiled.  Note the walkout and lower unit access points.  This has created a massive amount of extra concrete use, up to 70 m3 of concrete for the walls on this pour.  Th…

Here we have the basement being stripped and the foundation is unveiled.  Note the walkout and lower unit access points.  This has created a massive amount of extra concrete use, up to 70 m3 of concrete for the walls on this pour.  That is 50% more than my earlier semi detached basement pour.  The footing also consumed almost double the earlier, and simpler build. 

You need the government to give you permission to house yourself...

from the faq section of the new Alberta builder licence program:


What if I want to build my own home? Do I need to get a licence?


Individuals building their own home do not need to get a licence. Individuals can build their own home once they have been issued an Owner Builder Authorization by the Registrar.


This is another example of the absurdity of the bureaucracy under which we all must function.  If you want to build a house to live in for yourself, by yourself, you need the government to say it is ok, or you can’t get a building permit from any municipal authority without waiver of your builder licence.  You'd also need to get a waiver to avoid having to pay the warranty fee to put a warranty on your own self built home, which it can also decline to provide.  How long will it be before this government uses this power abusively and either requires cash payments to speed the process or decides the house you want to build is the the wrong place or won’t achieve the requirements of its agenda? Housing seems to be a constant target for government scope creep and bureaucratic fees.  This same government will complain later when there is an affordability issue, and its response will be to further raise taxes on builders without examining its own role in adding fees and inefficiency to the industry.  

Furnace and duct progress

My usual contractor is back to complete the mechanical work this week.  With the tin work well underway we can turn to electrical as our next work.   


IMAGE.JPG

the basement mechanical room is progressing nicely.    


IMAGE.JPG

The plumber and tin crew are working together to minimize bulkhead work that reduces the spacious feel of our high ceilings  

Semi plumbing and fireplace install.

After some difficult work at the rowhouse it was nice to return to the semi.  The drainage plumbing is progressing nicely and nearly complete.  The fireplace crew was on site as well and put in the units.  We’ve got some nice dual sided units that add a lot of luxury to the space.  


IMAGE.JPG

The drainage plumbing is one of the least diy friendly tasks, so we are grateful for the plumber taking care of it  


IMAGE.JPG

One of my favourite fireplace models is unfortunately frighteningly pricey.  

Footing prep and pour - rowhouse project

With very warm conditions the rowhouse footing will be the beneficiary.  Perfect day to pour and have the concrete cure in warm temperatures.   Getting this foundation done and backfilled will be a huge relief for the builder.  


IMAGE.JPG

You cannot understate the importance of getting this right...   

and a few hours later the trucks arrive and $5000 worth of concrete fills the forms.

and a few hours later the trucks arrive and $5000 worth of concrete fills the forms.

Killarney rcg land use change verdict

Council nearly unanimously voted for the rcg application on 26a st in Killarney.  This is the first, to my knowledge, of a location in the centre of the community to receive the approval.  The builder intends to do a four unit rowhouse and a modifier was embedded in the process to restrict height to 10m and remove the permitted use of secondary suites. 

It was an interesting debate and the opposition from local residents that appeared a little on the nimby side was generally ignored.   A member of the Killarney community association planning committee led the advocacy against the application and attempted to gather a petition and represent the entire community. I felt the choice of language, while perhaps innocent enough, was highly inappropriate and incorrect.    

It looks like the new council has digested what rcg is and does, and wants to amend and improve the category.  Administration is working on this soon and a report will be prepared for Council.  I’m in favour of this and pleasantly surprised how much policy and ideas have changed on this matter over a short time. Congratulations to the new small business row house builder homes squared and welcome to 26a st (site of my current semi).  


Land use public hearing - the Killarney rowhouse council vote

Council meets tomorrow and the meeting will slog painfully through twenty or more  secondary suite applications. Once that is done, who knows what time it will be, council must then deal with substantive planning matters throughout the city.  This could be well into the evening or possibly Tuesday morning.  

The rcg application on 26a st will be decided at that time.  It is very hard to predict the outcome of this vote, and not because four on council are new.  I’d suspect the new councillors will view this application favourably. What isn’t clear is how much community opposition there will be and how effective it is.  The applicant appears to have done a good job collecting support for the application and the community association avoided the nimby type reactionary oppposition.  This certainly changes my original prediction from the spring where I estimated the chance of success to be low. 

I’ll attempt to watch some of the webcast on my cell phone. Attending the meeting to watch in person when you can’t tell what time it will start is really disruptive to my work day.  Once the vote is over I will attempt to post as much detail from the results as possible.  


IMG_0418.PNG

The public hearing notice is posted on the property and online. Unfortunately they can’t tell you what time to watch the webcast.   

Building is hard, the rowhouse foundation edition.

The rowhouse project foundation, as I predicted, isn’t easy to build. All attempts I made to ward off problems preemptively were not successful.  The issues tend to deal with translation from computer screen to paper plan to a large hole in the dirt.  The surveyor is meant to be the translator in the critical step from drawing to dirt. Unfortunately the footing contractor determined (too late) that the survey points were inadequate leading to much debate and consternation about how to proceed (over a weekend). Have I learned my lesson in how to make sure a foundation is surveyed properly?  Should I not know by now what details must be on the plan such that the cribbers can do their job?  You’d expect so considering the number of houses that I’ve built over the years.  Hopefully this job site suffering can teach me some more lessons on what not to do that I can benefit from next time.  


IMAGE.JPG

the footing form work is underway.   


IMAGE.JPG

Some of the unfortunate details that needed deal with before work began.   

Pace of work - project to project comparison

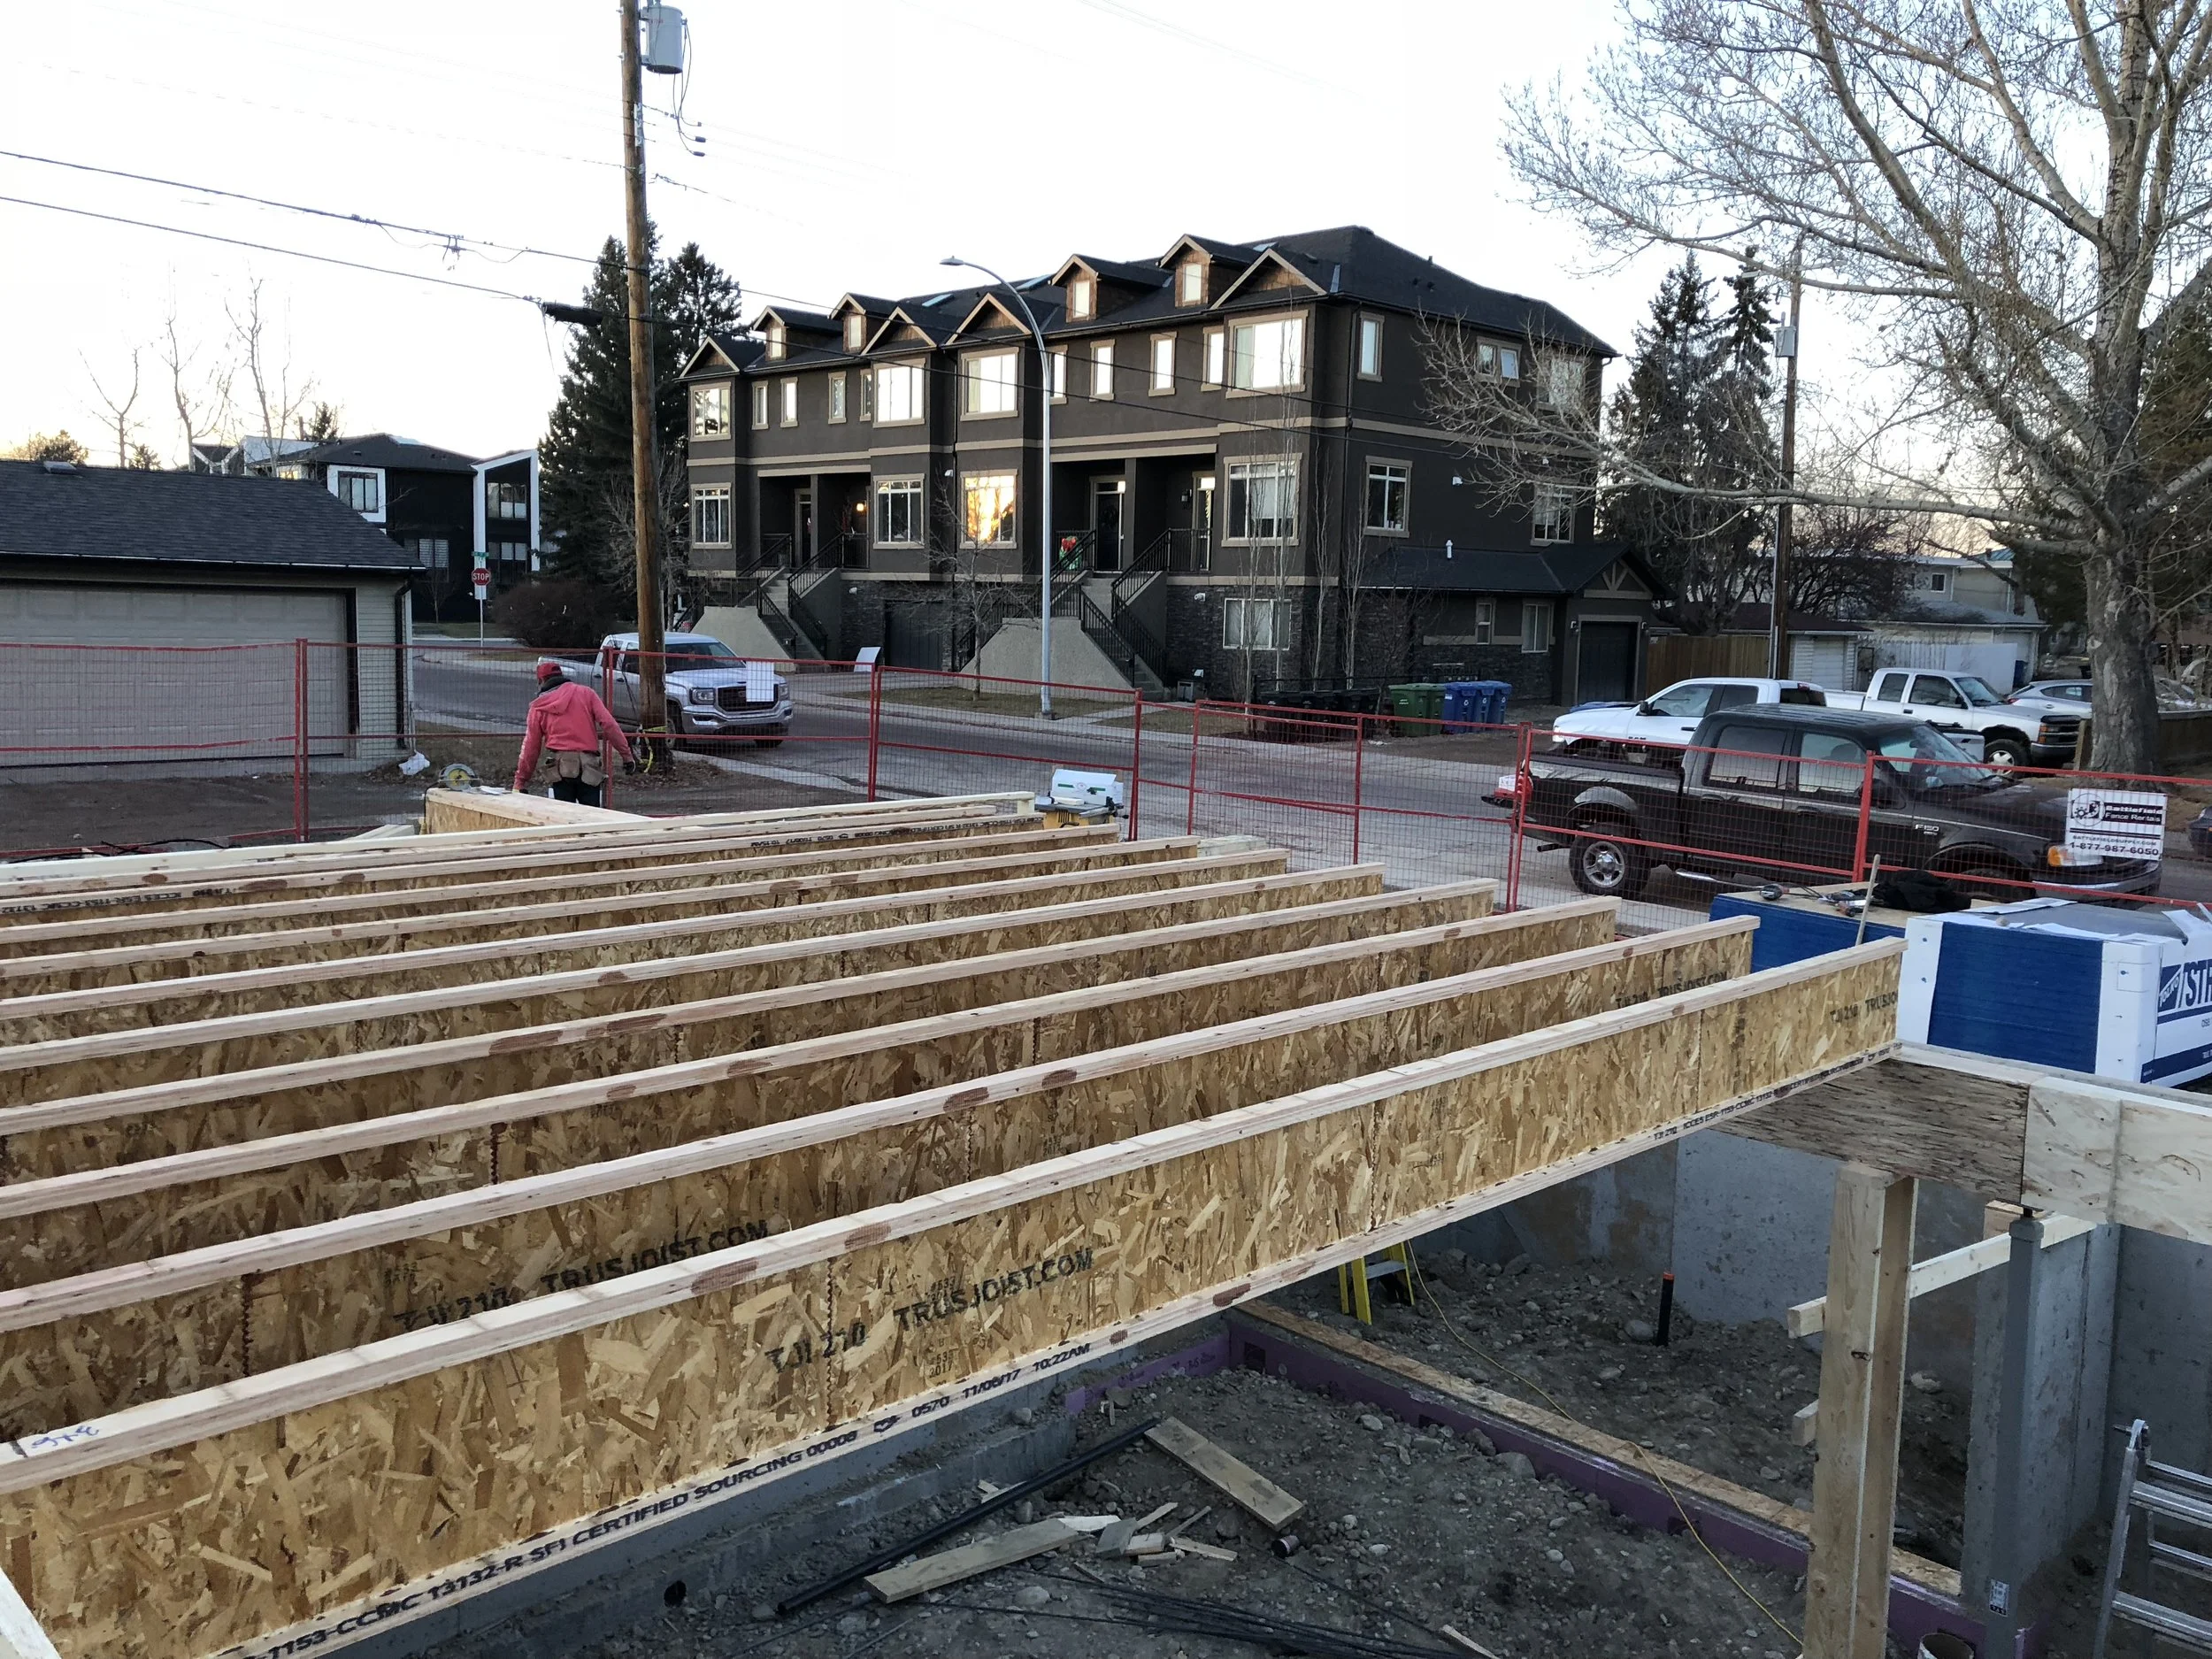
At the outset of this project I decided to focus (even more) on having the structural work done faster. During the last project we encountered severe winter conditions and the framing contractor had some personnel matters that slowed work.  As you will see from the numbers below, work pace was drastically impacted. 

previous project - Footing to Shingle total build time 90 days. 

current project - Footing to Shingle total build time 40 days.

All of this 50 day difference, which is a tremendous amount of time to save, is due to contractor selection.  The current project contractor was so fast I was having a hard time keeping up with material delivery and had to bring in both lumber and the windows at an accelerated pace over what I had planned.  Cumulative cost to build to date including land on the project is high, we are likely over $775k in expenditure.  That is a lot of money to be tied up unproductively for 50 unnecessary days due to the pace of labour.  If the time cost of the project works out to $200/day, which is a reasonable assumption given the utilities, taxes, fence and toilet rental, insurance, etc, the faster crew saved $10k in cost.  40 days is by far the fastest build I have been involved with to date.  

The remarkable productivity of the framing crew puts them to the top of my current 'favourite' contractor list.  Each project I re-evaluate the small businesses that best deliver for me and I sole source them work the next time.  Those crews get contracts without having to do any marketing and I can make a more accurate schedule, and we all benefit.

You can't start the shingle until the framing is done.  This makes the time from pouring the basement footing to starting the roofing a good metric to evaluate pace of work.

You can't start the shingle until the framing is done.  This makes the time from pouring the basement footing to starting the roofing a good metric to evaluate pace of work.


Shingle details

the roofers are dealing with some hideous weather by blowing off the roof and working on the warmer days. We’ve specified a duration shingle that claims to resist the wind storms that have blown off less brands.  We also have some W shaped flashed valleys on top of the usual ice and water and membrane layers.  Each stairwell features a skylight so those have been flashed with the factory kit.  Let’s hope these efforts lead to a roof with a long life.  


These shingles have the reinforced nailing strip so advertise better wind resistance.   

These shingles have the reinforced nailing strip so advertise better wind resistance.   

q1%K2aESSU29+2MBdt68jA.jpg