Plumbing final underway

The plumber is back to tackle the finish work. This mostly includes the faucet trims and under cabinet drains. After this is done we can get on with some cleaning as the site is a hideous mess.  Lots of cardboard and dust to deal with during the finish work.  


IMAGE.JPG

Taps and toilets going in.  

The rental pro forma - how can this calibre of financial information be distributed by professionals to the public?

An unexpected real estate advertisement appeared in my inbox the other day.  It promised an amazing opportunity and attached some attractive sales brochure type information.  I decided to take a look, because clearly anyone willing to prepare this material surely would have an interesting proposal for me to review.

In order to protect the names of the innocent (and guilty), I wont bother to post the entire document, but I will include a tidbit of some of the most egregiously horrible misinformation.

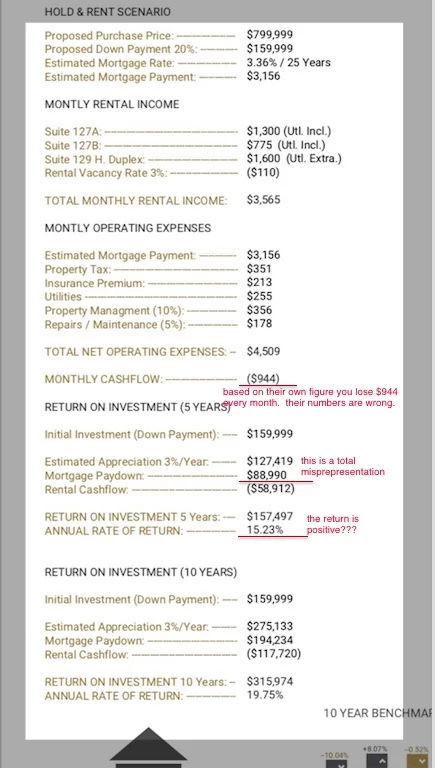
So to start, the amazing real estate opportunity to own your own rental property, as calculated by the sellers own  (incorrect) figures, loses $944 each month (when it is rented and the tenants pay according to the lease).  So at best, the owner would have to dig deep into her pocket and come up with the $944 each month to pay the mortgage.  This sounds like a negative return doesn't it?  No, after five years, the ROI is indicated at almost 15%!!  That is good.  Time to call your favourite realtor and write up an asking price offer!

Once you dig a little deeper, you will find that the math here is just terribly inaccurate.  In fact it is so full of errors that you have to assume it is purposeful.  Could anyone really be that wrong though?  Could a realtor who is a professional in dealing with property as his full time career be so off on his numbers?   

I will list a few real numbers below to show how I can irrefutably show the rental pro forma presented is just awful.

1.  The downpayment cost is not calculated.  The buyer needs $160k down to buy this deal.  If that money was invested in a conservative 5% yielding investment, it would earn $666 per month.

2. The monthly loss based on rent vs expense, if this is even accurate, is already -$944.  Once you lose the further $666 which is income you give up from the downpayment, that loss broadens now to $1610.

3.  But this deal has a 15% five year return, how can that be when it loses $1610 each month?  The supposed return is based on assumption of future appreciation and mortgage pay down, but this is calculated wrong as well.

4.  The realtor suggest the property will be worth about $927k in five years, plus the mortgage will be $88k lower, so the return, after losing $59k over those same years still pencils out as positive $157k. I will show how wrong this is below:

  • There actually is no mortgage pay down.  The mortgage is just dropping because the owner is paying it herself from the negative cashflow of -$1610 x 60 payments = $96k.  So the mortgage is $88k lower, but that cost $96k.  That means the owner paid $96k to payoff $88k in debt, that sounds pretty bad to me (the difference is interest to the lender).  Paying down your own debt is not profit.  That would be like moving a dollar from your left pocket to your right pocket, and claiming it as profit.
  • The appreciation is not assured - the property is already so over priced based on its rent to income ratio that is seems unlikely that further $127k of appreciation could occur. To realize this, the 2018 buyer would have to find a new buyer in five years that would view the property as even more valuable, despite the economics being even worse at that highly appreciated valuation.  To even get to that five year resale horizon, the buyer would need to come up with $96k to feed the loan.  
  • Sales costs are not factored into the return - in five years, the sale commission would be significant and would wipe out a lot of the appreciation (which may not have even happened).

This property is a hideous black hole of an investment that could really hurt the buyer.  I would urge no fledgling real estate investor to even consider the deal at the numbers shown. The realtor involved seems to know a little about real estate, but just enough to make him dangerous. If you are going to work with a realtor, take their advice, or accept their numbers as factual, you need to be extra careful and assume each number provided to be incorrect.

It is really troubling that this real estate profession is so often plagued by these borderline deceitful quasi professional looking information sheets. If this was a different type of investment brokerage, these documents would not be acceptable.  Yet somehow, for what could be an individuals largest purchase of his or her life, the realtor somehow can become a trusted advisor, yet offer advice that is simply garbage.

There are ways for a person to educate themselves on rental property.  I'd recommend the www.biggerpockets.com website.  While it is US based, it has some great calculators to take a lot of the mistakes out of rent/buy decisions.  

Take a look at the numbers here, this awful deal is presented as a winner. It is as far from a winner as I have witnessed.  

Take a look at the numbers here, this awful deal is presented as a winner. It is as far from a winner as I have witnessed.  

Rowhouse stucco prep

The stucco prep can begin despite conditions unfavourable for applying the sand and cement mix.  The tyvek and black paper layers also provide a significant amount of waterproofing for the building so we can eventually start interior insulation.  


IMAGE.JPG

Railing install

The railing material is being installed at the Killarney project.  We’ve got a continuous rail style with clips to fasten the glass to it.  The carpentry involved in this is always a painstaking affair.   


IMAGE.JPG

Measure more than twice to cut once on these installed.   

Hardwood stair detail and final finishing material is next

At the Killarney project the hardwood stair nosing detail is complete.  With the hardwood and tile done, that is the end of the flooring project. Next up is paint followed by finishing the baseboard and plumbing hardware.   After that is all done and the dust is gone we can do the lighting.  We’ve got some fun lights selected for the hanging fixtures as shown below  


IMAGE.JPG

this will sit over the bathtub. 

IMG_1320.JPG

many final touches to the stairs are needed. 

Congratulations to me - I have a builder licence

The province instituted a mandatory system to take money from builders in exchange for nothing. It is a pretty good deal for the government.  They get to take a lot of money and offer zero value in return.  Over time I am sure the government will ratchet up the cost and headache associated with retaining the licence.  That is what a bureaucracy does over time, it scope creeps and and causes more grief for those under its influence.

Now that I have a licence to do what I was doing before, without a licence, and for free, I wonder if I am a 'better' builder.  I could argue that I am the identical builder before and after the licence was issued but there is one key difference, I have $600 less each year to actually fix stuff that breaks.  The next time I have to fix something, I will just dig deeper into my pocket to find more money rather than invest it in some productive activity such as building more or better houses.

I'd like to see at the end of the year how much money the government has confiscated during this process, and to what benefit, if any, the money has been used for.  I am convinced the money will mainly go to some lucky bureaucrats in Edmonton who will graciously pocket the money while on vacation enjoying their paid time off.  I'd wager after a year the licence has had zero benefit to anyone outside of those recipients of the fees.

I guess if you work 300 days per year you give the government an extra tooney each day.  That is the Canadian way.

I guess if you work 300 days per year you give the government an extra tooney each day.  That is the Canadian way.


Unveiling the natural stone exterior work

The mason finished on the weekend and after a few days of heating and hoarding we unveiled the almost complete exterior of the Killarney project.  What is interesting about this project is the combination of new products.  We’ve got the metallic silver metal siding combined with large slabs of natural stone.  Just a little warm weather is needed and we can stucco and landscape.  


IMAGE.JPG

the stone is complete. 

Hardwood install

We’ve got the hardwood crew on-site now that the tile work is complete.  they make remarkable progress over the course of a single long day.  


IMAGE.JPG

The wide plank oak floors seems to be a trend that will never go out of style.  The cost to redo an entire 2000 sq ft house in hardwood would be very large so use of timeless natural products makes a lot of sense.  

Grout - the final component of the tile job

The crew was back this afternoon to begin the process of grouting the finished tiled areas.  There is always some discussion on using matching vs contrasting grout.  I prefer matching grout generally, but in a few instances a white grout is best to make smaller tile patterns stand out. I do avoid the lighter grouts on floors or in wet areas, it just isn't worth the effort to try and clean white grout later on.

The white grout was a good choice on our brick tex walls.  

The white grout was a good choice on our brick tex walls.  

Natural stone sealant - before and after

The mason advised the application of a sealant on the natural stone product.  We did a side by side comparison of the stone with and without the sealer.  The verdict was definitely to go ahead and seal the stone.  This is a very quick and easy maintenance step that can be done for less than $20 in supplies.  Re-application is suggested, but we can wait a year or two and see how it looks.  Zero skill is required, you just apply with a rag and let dry.

The sealant highlights the natural grain of the stone. We will unveil the finished stone wall in a few days once it is all cured.

The sealant highlights the natural grain of the stone. We will unveil the finished stone wall in a few days once it is all cured.

live33st.com signage

With a lot of inside work progressing at the rowhouse project, I felt it was time to get some advertising signage posted on the street facing fencing.  The purpose here is to start identifying possible residents of the live33st.com townhouses to move in this summer.  

large black and white signage carries a simple message and the website address.  

large black and white signage carries a simple message and the website address.  

inner city snow removal - is it so hard?

Without question this winter has been hideous for the home builders, with constant snow removal problems in January, February, and March.  Many homes have had ice dam form on the roof edge, resulting in meltwater backup and water damage inside, even on new roofs.  The City seems incapable of even plowing the grid streets of the inner city, so snow removal in the culdesac suburban landscape would be unthinkable.

Why can the city not do one or two plows in the inner city areas? the taxes on new homes is approaching $6000 per year, that is a lot of money.  Each time a builder finishes a new semi-detached, the the tax base grows from $3500 to $11000 per year.  That should pay for a little better service for snow removal than in the low density sprawl areas.  

The problem with not plowing the roads, but ensuring the sidewalks are shovelled, is we get problems like this:

The streets are ice packed over top the curb so meltwater has nowhere to flow except on the sidewalk!  At night the flowing river freezes and this makes for a very dangerous situation.  Thanks for the great work City.  Maybe you shoul…

The streets are ice packed over top the curb so meltwater has nowhere to flow except on the sidewalk!  At night the flowing river freezes and this makes for a very dangerous situation.  Thanks for the great work City.  Maybe you should spend some of the $20,000 I gave you in fees to do a little snow removal.

Stone progress

The mason is now installing slabs on the wall. We are using a 3D type effect to highlight the stone. Note the tremendous colour change once the stone is wet or a sealant is applied.  


IMAGE.JPG

Stone is looking good.  

Tile progress

The full tile crew arrived today and that collection of four good tilesetters really has an impact.  The master bathroom is almost complete and some of the backsplash feature wall material is going on as well.  With the tile wrapping up, we are into hardwood next (already started the stairs).  Progress is continuing nicely with the tile and grout has been selected in all areas.  In short order we will be into touchups, painting, and appliances.  The first home should be on the market in April.

Powder room wall tile is supposed to make a statement.  Looks good so far and is awaiting a white grout to complete it.

Powder room wall tile is supposed to make a statement.  Looks good so far and is awaiting a white grout to complete it.


Stone prep

The preparation and scratch coat is well underway now at the semi detached project. We are using a very attractive natural stone product and it promises to look very interesting once finished.   


IMAGE.JPG

the stone is kept indoors so that it can be warm enough to install.  

And the first pieces go on...

And the first pieces go on...

Tile progress - Killarney project

The tile crew is ramping up now to really get moving at the Killarney semi detached project.  A lot of the prep is complete and the shower tiles are nearly done.  The fireplace should be starting tomorrow and the entire job wrapped up by Thursday.  


IMAGE.JPG

master shower nearly done.  The base is a matte finish hexagon mosaic that I like to use. 

Gas line work at the rowhouse - drill bit return on investment is high

I recently purchased a $135 drill bit from amazon in the interest of economizing on the recurring charges to hire a contractor to make holes in concrete.  Today we cored a bunch of holes in the rowhouse party walls for our gas pipe.  Essentially with the first successful hole we paid off the cost of outsourcing the job. Each subsequent hole is now free until the bit is worn out.  Looks like we can preserve the bit for many jobs to come provided we avoid hitting rebar.  


IMG_1239.PNG

Bosch once again makes an exceptional product and we’ve cored our holes quickly and at our convenience.   


IMAGE.JPG

The plumber shows off his concrete drilling skills.  

Ground thaw - construction waits for no one including nature

Despite the hideous winter conditions that seem to maybe be finally relaxing a little, we need to proceed with the garage.  This means thawing out the ground frost so we can pour the slab.   We’ve got a new crew with a hydronic heating truck. Essentially hot liquid is pumped in pipes laid on the ground under a tarp.  Eventually the ground thaws and we can pour the slab.  It costs a little extra money but what is even more costly is delaying the entire project until spring weather thaws the ground.  We want to do our stucco once rather than make two trips out of it and we need to get landscaping right away (in may). 


IMAGE.JPG

we used a skid steer to remove the snow and the heat unit is placed right beside the garage.  Once thawed we can start the concrete prep work.  

Hideous decor somehow now means a higher valuation in Calgary

One of my favourite tactics of the Calgary realtor is how they have zero concept of project economics but somehow they manage to turn lemons into lemonade.  

When marketing a house that has never been renovated they say ‘owned by the same family for 50 years’.  How does it benefit the new buyer that the garbage house was owned by someone for 50 years who let it decay without improvement?  

somehow the realtor wants to capture the future value of the renovations before the house is sold to the renovator.   

The danger with these type of old houses is even a 100k gut renovation will not add any value to the house. It will still trade for land value.   And of course the house is already listed over land value.   


FullSizeRender.jpg

you can have this fantastic decor for 600,000$ 

Sound management products for new construction - rowhouse edition

The makeup of the rowhouse project, with upstairs and downstairs units, is a strong candidate for advanced sound reduction techniques.  The challenge with wood frame buildings, as we typically build today, is that they are excellent at transmitting sound and vibration, especially through the floor.

As the project owner/builder/person in charge of everything, I have to make the decision on what additional materials are worth the investment to reduce sound.  To me, significant expenditure is justifiable here, because sound transmission through the floor is particularly annoying.  A noisy building could lead to a reduction in satisfaction of the residents, higher turnover, conflict and complaints to management (i.e me), etc.

It is hard to quantify a certain amount of sound reduction, measured by STC rating, for a given amount of money spent.  Despite the lack of certainty, I am going to go ahead and invest where I have come to believe, after my research, major improvement can be made.  I believe the biggest issue will be footsteps, or banging, music, and conversation from those living in the upper unit, which happens to be located above the bedroom of the lower unit.  Impact noise I have come to believe cannot be mitigated without some different ceiling assembly and products than are conventionally used.

The primary technique I am going to deploy is a rubber clip that is used to attach the drywall to the ceiling.  By disconnecting the drywall from the structure, impact noise will be dampened, I am also going to use a green glue gell product that is spread in between the double ceiling drywall sheets (both type x 5/8 drywall).

these are the rubber clips that fasten to the ceiling.  A drywall hat channel goes in next, and then drywall screws on to that.  It replaces another product, the drywall sound bar, that is more inclined to fail or be short circuited.  

these are the rubber clips that fasten to the ceiling.  A drywall hat channel goes in next, and then drywall screws on to that.  It replaces another product, the drywall sound bar, that is more inclined to fail or be short circuited.  

This is the total assembly of the ceiling of the lower unit, with some minor difference.  Firstly, we don't have open web joists, we have the closed style. These are likely noisier than open web joists.  Secondly, we are going to use the g…

This is the total assembly of the ceiling of the lower unit, with some minor difference.  Firstly, we don't have open web joists, we have the closed style. These are likely noisier than open web joists.  Secondly, we are going to use the green glue sound damping product between the two layers of drywall, this should add some further STC value.  We don't know exactly what, because this assembly has not been modelled by the consultant that published this work.